How To Draw Shirt Collars
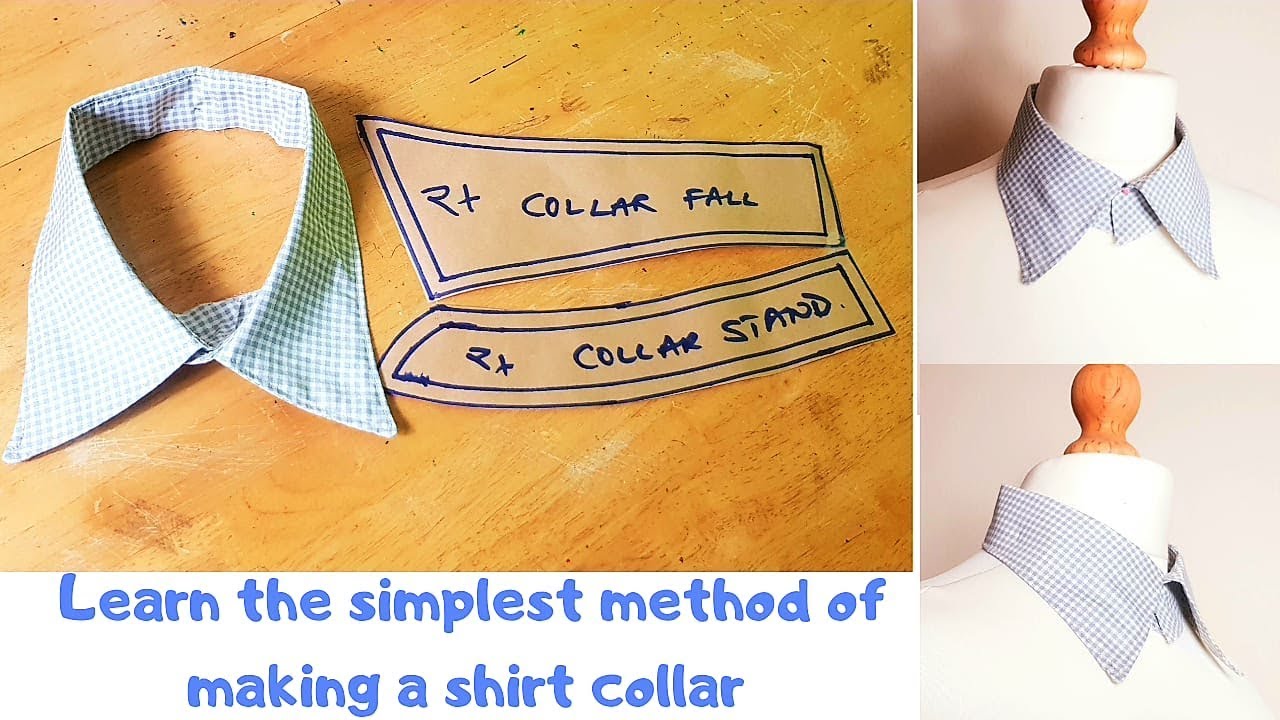
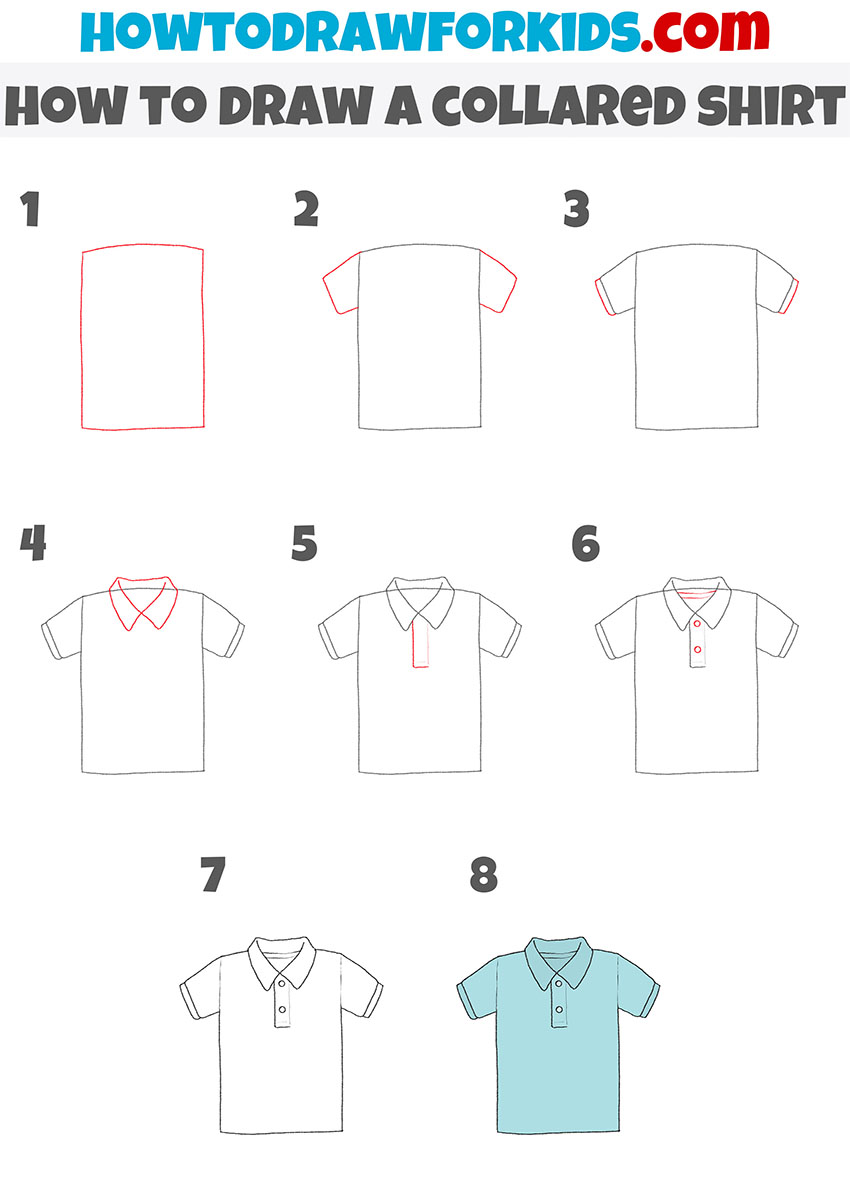
How To Draw Shirt Collars - This completes the outline of the collar. Web drawing shirt collars can be super fun! The collar on a shirt can be different sizes and shapes depending on how it’s made! Web for this illustration, we will be adding a shirt underneath the notched collar jacket. Start with the collar of the shirt. Next draw the sides sides followed by the lower part of the inner outline and then the upper part. Drawing a shirt collar can be quite tricky, which is why you also need to learn how to draw a shirt collar first. The first thing you need to draw for your shirt is the collar. To draw the collar, start by drawing two small rectangles at the top of the neckline, slightly extending outward. Web draw a horizontal oval at the waistline taking the waistline as its dividing line. How do i draw the collar of the shirt? Web in this fashion school with nick verreos video, nick shows you how to draw basic shirt collars including the convertible, band/nehru, mandarin and peter p. Now let’s put on a collar and neckline! Make sure all lines draw lightly because in the future we erase this line. Connect the two sides of the collar with a short line as well. Start with an outline of the top. Make sure the collar is an oblong shape and symmetrical on both sides. Web how do i draw a collar shirt? Following the sides, draw the lower part of the inner outline and the upper part. Draw the collar of the shirt by making a curvy line around the neck part. Web draw a horizontal oval at the waistline taking the waistline as its dividing line. Then, draw two lines for the sleeves extending from the sides of the torso. Dark lines can be damaged your paper when it removes. Add some lines on the neck for details. Connect the two sides of the collar with a short line as well. Start with the collar of the shirt. This line should never be too wide, as this will make the. Draw a horizontal line using any scale. Web draw fashion design collars. Next draw the sides sides followed by the lower part of the inner outline and then the upper part. Web learn how to draw collars with these simple and creative techniques. Enhance your artwork with stylish collar designs and bring your characters to life. The first thing you need to draw for your shirt is the collar. Start with an outline of the top. Web let’s take a look at how it’s done step by step: Web drawing shirt collars can be super fun! Web the second step is to draw the shape of the collar. Next draw the sides sides followed by the lower part of the inner outline and then the upper part. You can see the drawing steps for it in the example above. At the bottom of the neck, draw an oval. Web learn how to draw collars with these simple and creative techniques. Now add the jacket collar. Web draw fashion design collars. Following the sides, draw the lower part of the inner outline and the upper part. Web shirt collar drawing step by step. Web draw fashion design collars. You can also connect the two sides of the collar with a short line. Begin with an outlined of it’s top. Enhance your artwork with stylish collar designs and bring your characters to life. This line should never be too wide, as this will make the. Learn how to draw ascots, bow ties, scarves and other collars for dress or shirts in this free video series from a fashion design graduate student. Web shirt collar drawing step by step. Web drawing shirt collars can be super fun! Start with an outline of the top. Make sure the collar is an oblong shape and symmetrical on both. Connect the two sides of the collar with a short line as well. Web drawing shirt collars can be super fun! This part of the shirt is called the placket. When you are drawing a collar, make sure that you make it as. At the bottom of the neck, draw an oval shape to close the neck and. Draw the collar of the shirt by making a curvy line around the neck part. Start with an outline of the top. Web in this video tutorial, viewers learn how to draw an animated shirt collar. Open your sketch book or pickup a paper and hold on pencil on the hand. Now add the jacket collar. Begin by drawing the neck of the figure and attach the head to the neck by connecting it with a chin. You can see the drawing steps for it in the example above. Connect the open ends of one triangle to the open ends of the other triangle using curved lines. Now let’s put on a collar and neckline! Web. Now let’s put on a collar and neckline! Connect the open ends of one triangle to the open ends of the other triangle using curved lines. This part of the shirt is called the placket. Draw another triangle at the centre of the waistline for the tip of the tie. Next draw the sides sides followed by the lower part of the inner outline and then the upper part. It all depends on the style and type of collar you want to draw. Start by mapping the shirt collar on both sides of the neck. Enhance your artwork with stylish collar designs and bring your characters to life. Start with an outline of the top. Start with the collar of the shirt. With the help of this guide, you'll be able to draw a perfect collar shirt in no time! Draw a horizontal line using any scale. Web in this fashion school with nick verreos video, nick shows you how to draw basic shirt collars including the convertible, band/nehru, mandarin and peter p. The first thing you need to draw for your shirt is the collar. How do i draw the collar of the shirt? You can also connect the two sides of the collar with a short line.
how to draw collared shirts howtotieabowonpantsstepbystep

how to draw shirt collars cottoneyejoetutorial

How To Draw Collared Shirts howtojkl

How To Draw A Shirt Collar HOWTOCI

How To Draw A Collared Shirt StepByStep Guide Best Casual Shirts

how to draw a shirt collar Brunilda Fitzpatrick

How To Draw A Shirt Collar at How To Draw
How To Draw A Shirt Collar DRAWING IDEAS

how to draw a shirt collar Renita Dexter
How to Draw a Collared Shirt Easy Drawing Tutorial For Kids
Add Some Lines On The Neck For Details.
Web Let’s Take A Look At How It’s Done Step By Step:
Web Draw A Horizontal Oval At The Waistline Taking The Waistline As Its Dividing Line.
You Can See The Drawing Steps For It In The Example Above.
Related Post: